Thumbnail cache refers to the small preview images (thumbnails) saved by the operating system or application which is used to speed up loading when browsing through directories. In Windows, it helps quickly load thumbnails of images, videos, documents, or a large amount of media files in File Explorer, making file browsing much faster.
Sometimes, the thumbnail cache files can become corrupted, leading to thumbnails display incorrectly or load slowly. Clearing the files and rebuilding the thumbnail cache can often resolve the problem.
Method 1 Manually delete thumbnail cache files
You can try clearing the thumbnail cache manually by following these steps:
Step 1. Open File Explorer
You can directly open File Explorer by pressing the Windows key + E on your keyboard.
Step 2. Locate the folder
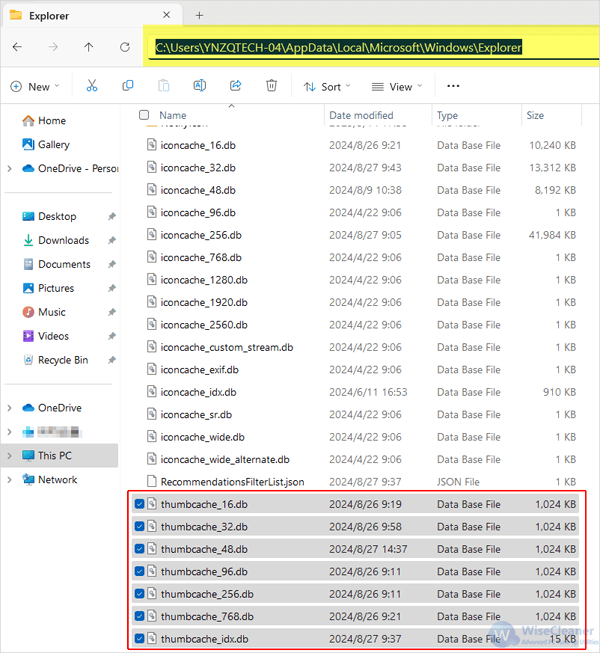
Then, navigate to the following thumbnail cache location:
C:\Users\
If you cannot find the thumbnail cache files in this location or the AppData folder, enable the Show hidden items feature in File Explorer first.
Step 3. Delete the cache files
Here, locate and delete all the files named “thumbcache.db”.
Step 4. Restart the PC
After cleaning the cache, restart your PC to check if the thumbnail works normally, as the system will rebuild thumbnail cache automatically when you access the folder again.
The above method can be helpful in cleaning the thumbnail cache in your system. However, manual processes can be time-consuming and might not yield the desired results. So instead, you can use a professional third-party tool like Wise Disk Cleaner to automatically clean the thumbnail cache within few clicks.
Method 2 Automatically clean the thumbnail cache
Wise Disk Cleaner is a free utility designed to help you clean and optimize your Windows computer by removing unnecessary files and junk that accumulate over time. Follow these steps to automatically clean the thumbnail cache on your computer:
Step 1. Download & install
If you have not already installed Wise Disk Cleaner on your system, download it from the official website. Then, install it by following the on-screen instructions.
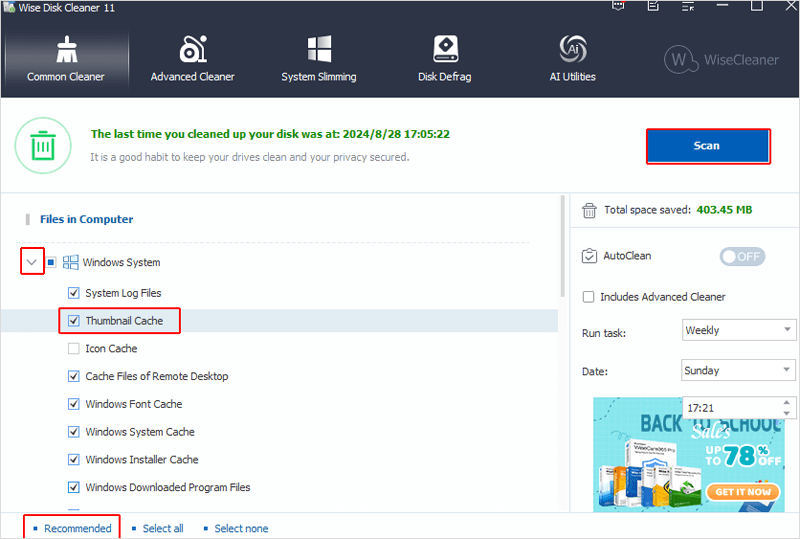
Step 2. Choose Common Cleaner
After installing, launch the program. You will see several tabs at the top of its main interface. Click on the Common Cleaner tab. This feature allows you to clean up common junk files from your system, including thumbnail cache.

Step 3. Select Thumbnail Cache
In the list of Files in Computer, you will see the Windows System option. Click on the arrow next to it to open its drop-down list. Then, find Thumbnail Cache, and make sure the checkbox next to it is checked.
In addition to this, you can also click on Recommended at the bottom of the main window. By default, the thumbnail cache will be cleaned if you select the Recommended mode.
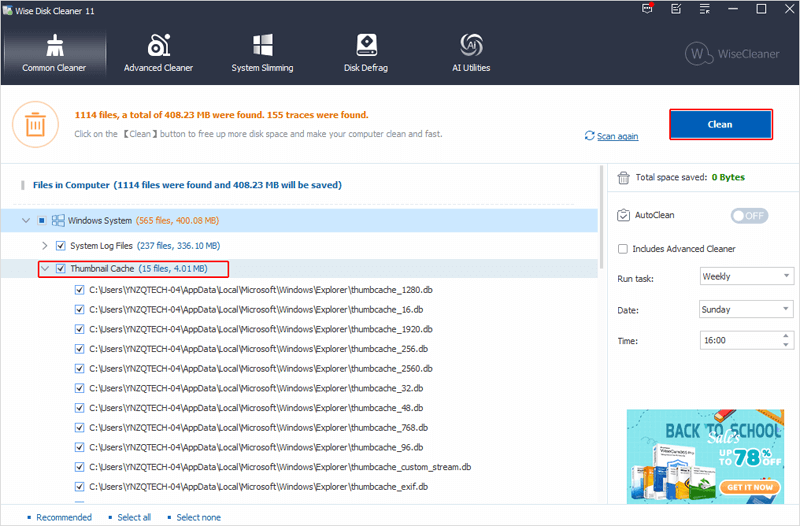
Step 4. Scan & clean
Now, click on the Scan button to let the program search for the thumbnail cache and other junk files.
Wait a while until the scanning process finishes, and review the results displayed. Ensure the check box for Thumbnail Cache is selected, and click the Clean button to remove these junk files from your computer.
Sum up
This is how to clean the thumbnail cache files manually and automatically from your computer. After cleaning, you should be able to fix the issue of incorrect thumbnail display and free up your disk space. Do not hesitate to try Wise Disk Cleaner now.