Running out of storage space on your computer can be frustrating, especially when you're unsure of what is consuming it. Learning how to locate large files can quickly help free up space. In this article, we'll explore four easy methods to find large files on Windows 11, offering straightforward techniques to identify and manage the sizable files occupying valuable disk space.
Method 1. Find Large Files via File Explorer
File Explorer provides a straightforward way to search for large files.
1. Press Windows + E to open File Explorer.
2. Choose the drive you want to search (we will take C drive as a case to clarify in this article).
3. Click on the search bar in the upper right corner, type size:Large (128MB-1GB), size:Huge (1GB-4GB), or size:Giganti c (>4GB). You can also define a custom size by typing size:>1GB.
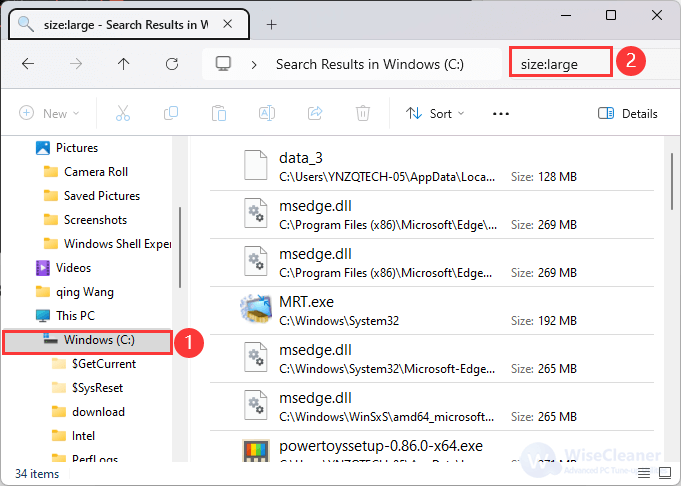
4. Once the search completes, click the Size column to sort files from largest to smallest.
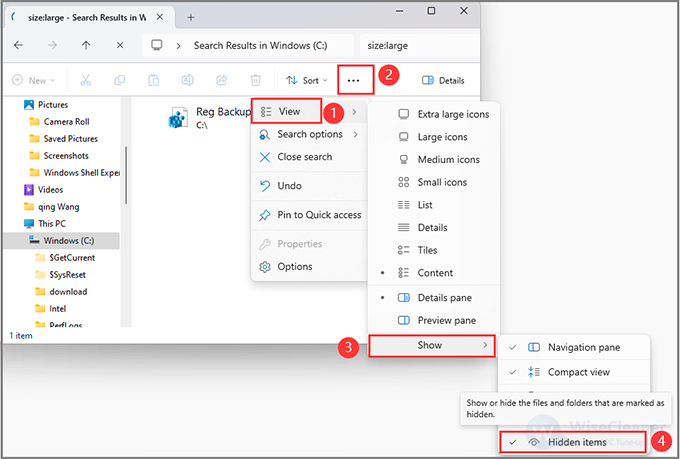
Note: If you have hidden files, select View at the top of the File Explorer screen and click Show to show the hidden files.
Method 2. Find Large Files Using Command Prompt
The Windows Command Prompt is a powerful tool that can help you troubleshoot system issues, run programs, or configure some settings. Surprisingly, this tool can also help you locate large files on your device.
1. Press Win + S to open the Search window, type cmd, then select Run as administrator to go on.
2. Type the following commands and press enter respectively:
cd C:\ (search the entire C drive)forfiles /S /M * /C "cmd /c if @fsize size(bytes) echo @path > largefiles.txt (Replace size (bytes) with the specific file size.)>
The following size conversions can help you find those large files easily:
- 1 KB = 1024 B
- 1 MB = 1,048,576 B
- 1 GB = 1,073,741,824 B
So, to find files larger than 1GB, your command should be:
forfiles /S /M * /C "cmd /c if @fsize GEQ 1073741824 echo @path > LargeFilesList.txt"
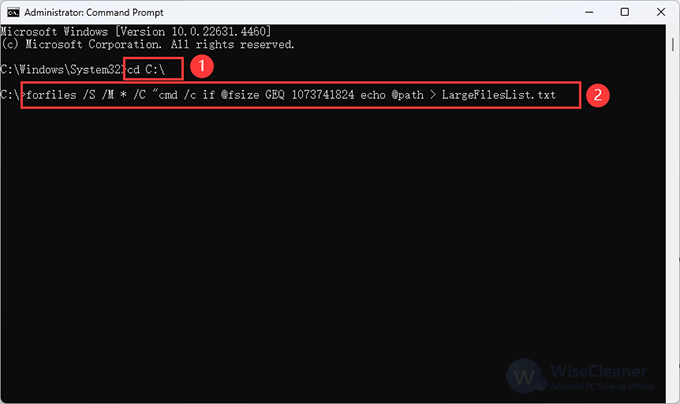
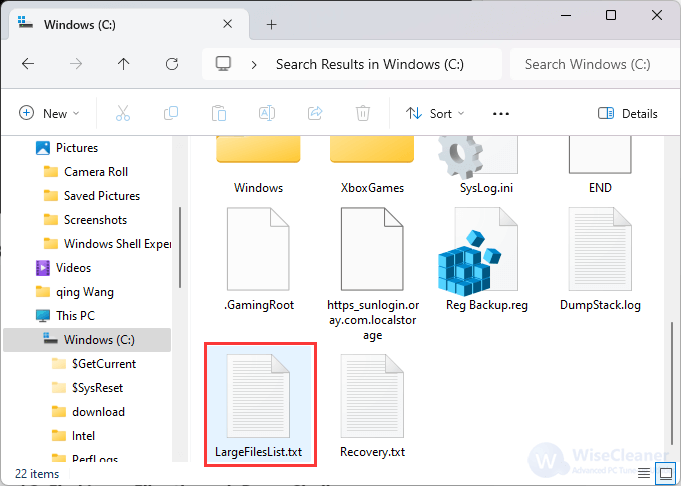
3. CMD will then create a LargeFilesList file containing a list of all the large files on your PC. You can find the LargeFilesList file in the C drive.
- Press Win + E to open File Explorer
- Click This PC on the left pane, then select Windows (C:) on the right-hand side
- Double-click the LargeFilesList file to open it
Method 3. Find Large Files through PowerShell
You can also find big files via Windows PowerShell by following this below.
1. Press Win + S to open the Search Bar, enter Window PowerShell, and select Run as administrator to open it.
Type this command, which will display the 20 top files in descending order, and replace 20 with the number of files to see.
gci -r| sort -descending -property length | select -first 20 name, length
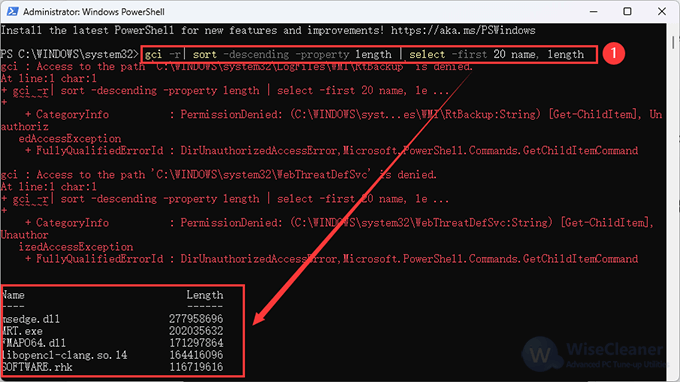
3. To find by length use this command. For instance, type the following command to find files over 1 GB.
Type Get-ChildItem -Recurse | Where-Object { $_.Length -ge 1073741824 } | Select-Object -ExpandProperty FullName
You can adjust the 1073741824 value (1GB in bytes) to your desired size threshold.
Method 4. Using Wise Care 365 to Find Large Files
If you are tired of using commands to navigate those big files, Wise Care 365 would be a time-saving choice.
Wise Care 365 is a comprehensive tool to help clean up disk and fix registry problems on your computer, protecting your privacy and making your PC more secure. Correspondingly, it can also quickly screen out large files for you to manage.
Step 1. Get Wise Care 365
You can download and install Wise Care 365 from here.
Step 2. Navigate to the Big Files Manager feature in Wise Care 365
After installation, launch Wise Care 365 directly. Then, click the System Cleaner, and you will find Big Files Manager located on the left pane.
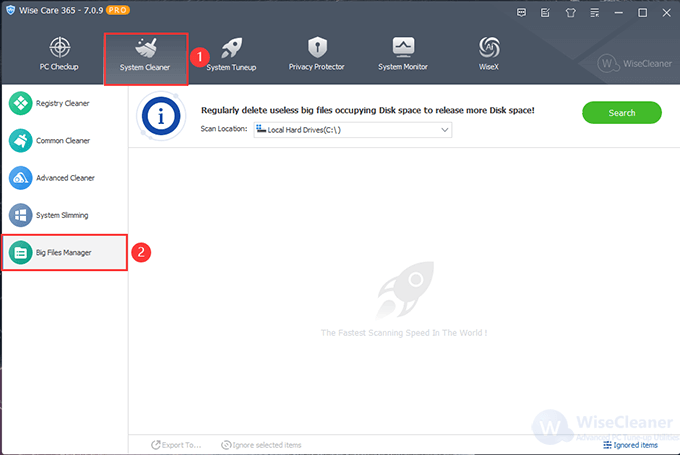
Step 3. Select the location to scan
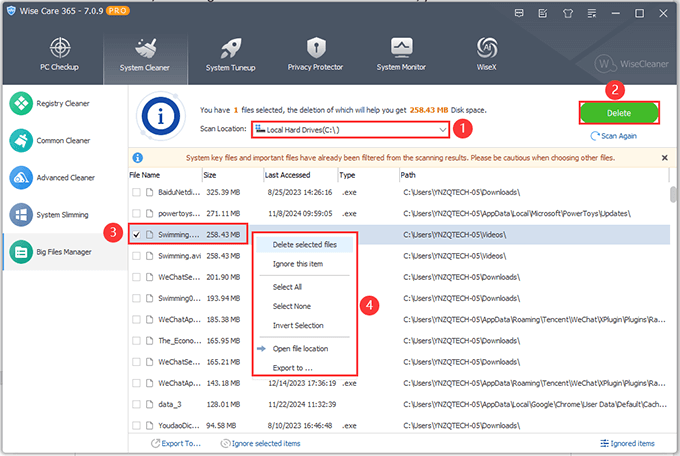
On the Scan Location area, select a location that you desire to scan, then click the Search button to execute.
After seconds, those large files will be listed in Wise Care 365, you can delete them or open their locations.
Conclusion
By employing the four methods outlined in this article—using File Explorer, Command Prompt, PowerShell, and Wise Care 365—you can take control of your large files with ease. Each method offers a unique approach, from built-in Windows tools to third-party applications, ensuring there's an option that suits both technical and non-technical users alike.