WiseCleaner Think Tank
Encounter difficult computer problems?
All about maintenance and optimization of your Windows System.
Jan 17, 2025
The installation error 0x80070103 is a common installation issue that often occurs when updating drivers on Windows 11. This error typically arises when Windows Update tries to install a driver already installed or when there's a compatibility issue. Fortunately, there are several methods you can use to troubleshoot and resolve this error. Here's a step-by-step guide to help you fix the 0x80070103 install error on Windows 11.
Before diving into more technical solutions, try pausing Windows updates temporarily. This can prevent the system from attempting to install the problematic driver.
1. Open Settings by pressing Win + i.
2. Go to Windows Update.
3. Click on Pause updates for 1 week.
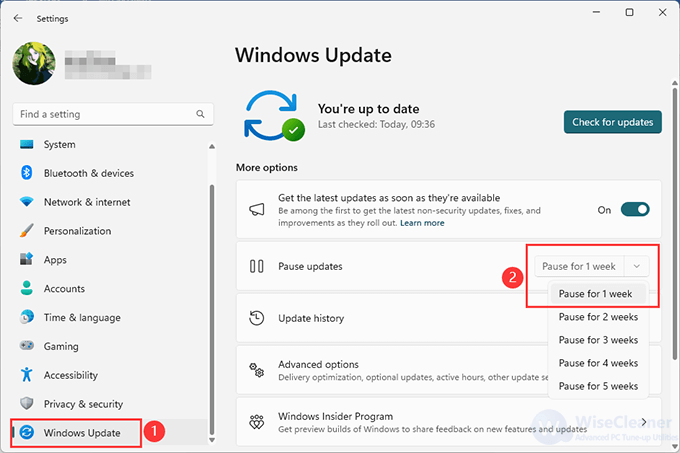
4. Then, click the Resume updates button. Wait for Windows to check for updates, which should no longer display the problematic driver update.
Another way to complete the installation would be to download it from the Microsoft Update Catalog and then install it manually.
1. Open Settings by pressing Windows + i and click Windows Update.
2. Go to the Update history part. Check if there are failed install numbers.
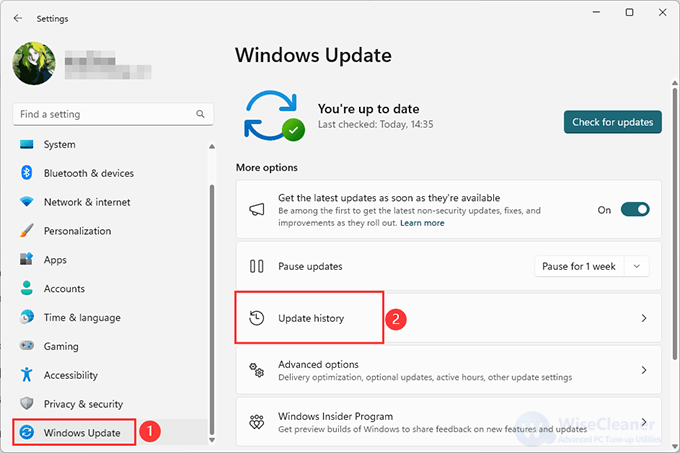
3. Copy the failed update number. Go to Microsoft Update Catalog and search for the update number.
4. Download it on your PC. Then double-click to launch the installer and then update it. If this does not resolve the issue, you might want to uninstall the driver completely and perform a fresh installation.
Apart from installing major updates, Windows can sometimes generate updates for upgrading drivers separately. And since the 0x80070103 error is related to problems with drivers, this solution could be effective.
1. Press Windows + i to open the Settings, select Windows Update on the left panel, and click on Advanced options on the right.
2. Go to the Additional updates section and click Optional updates.
3. Select the drivers or other optional updates that you want to install and click the Download & install button.
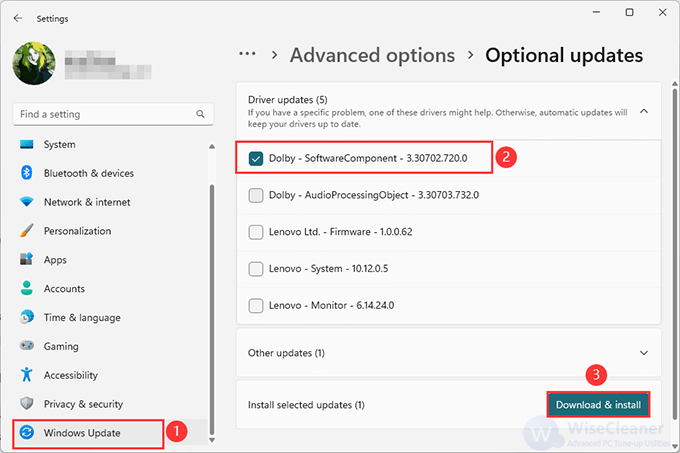
4. Then Windows 11 will automatically download and install your selected updates. Of course, you may need to reboot your system to execute these changes depending on the updates.
Sometimes, simply restarting the Windows Update service might help you resolve the install error 0x80070103 in Windows 11.
1. Press the Windows + R to open the Run dialogue box. Then type services.msc and click OK to open the Services application.
2. From the list of applications, right-click Windows Update to select Stop.

3. Then, right-click Windows Update again. Then click Restart.
Once done, restart the computer and check if the install error 0x80070103 is fixed.
Windows 11 provides a built-in troubleshooter for addressing update-related issues.
1. Open Settings.
2. Go to System > Troubleshoot > Other troubleshooters.
3. Find and run the Windows Update Troubleshooter.
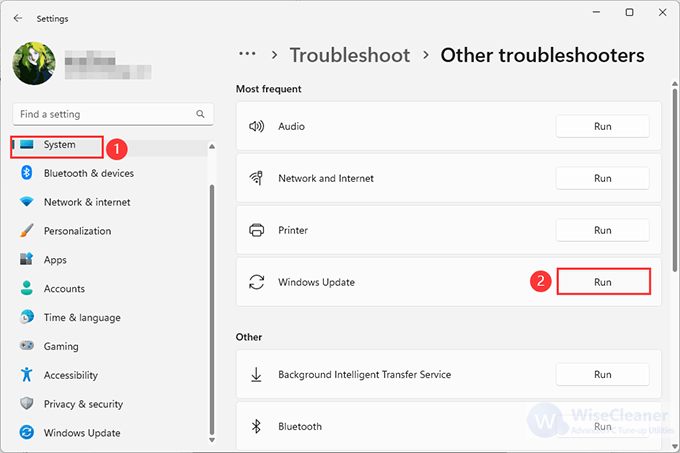
4. Follow the on-screen instructions to let Windows identify and fix the issue automatically.
If the above steps do not work, resetting the Windows Update components might help. You can reset Windows update components by using a batch file
1. Press Win + S to open the search menu.
2. Type Notepad in the search box and press Enter.
3. Copy and paste the following command in the Notepad window.
net stop bits
net stop wuauserv
net stop appidsvc
net stop cryptsvc
Del "%ALLUSERSPROFILE%\Application Data\Microsoft\Network\Downloader\*.*"
rmdir %systemroot%\SoftwareDistribution /S /Q
rmdir %systemroot%
system32catroot2 /S /Q
sc.exe sdset bits D:(A;;CCLCSWRPWPDTLOCRRC;;;SY)(A;;CCDCLCSWRPWPDTLOCRSDRCWDWO;;;BA)(A;;CCLCSWLOCRRC;;;AU)(A;;CCLCSWRPWPDTLOCRRC;;;PU)
sc.exe sdset wuauserv D:(A;;CCLCSWRPWPDTLOCRRC;;;SY)(A;;CCDCLCSWRPWPDTLOCRSDRCWDWO;;;BA)(A;;CCLCSWLOCRRC;;;AU)(A;;CCLCSWRPWPDTLOCRRC;;;PU)
cd /d %windir% system32
regsvr32.exe /s atl.dll
regsvr32.exe /s urlmon.dll
regsvr32.exe /s mshtml.dll
regsvr32.exe /s shdocvw.dll
regsvr32.exe /s browseui.dll
regsvr32.exe /s jscript.dll
regsvr32.exe /s vbscript.dll
regsvr32.exe /s scrrun.dll
regsvr32.exe /s msxml.dll
regsvr32.exe /s msxml3.dll
regsvr32.exe /s msxml6.dll
regsvr32.exe /s actxprxy.dll
regsvr32.exe /s softpub.dll
regsvr32.exe /s wintrust.dll
regsvr32.exe /s dssenh.dll
regsvr32.exe /s rsaenh.dll
regsvr32.exe /s gpkcsp.dll
regsvr32.exe /s sccbase.dll
regsvr32.exe /s slbcsp.dll
regsvr32.exe /s cryptdlg.dll
regsvr32.exe /s oleaut32.dll
regsvr32.exe /s ole32.dll
regsvr32.exe /s shell32.dll
regsvr32.exe /s initpki.dll
regsvr32.exe /s wuapi.dll
regsvr32.exe /s wuaueng.dll
regsvr32.exe /s wuaueng1.dll
regsvr32.exe /s wucltui.dll
regsvr32.exe /s wups.dll
regsvr32.exe /s wups2.dll
regsvr32.exe /s wuweb.dll
regsvr32.exe /s qmgr.dll
regsvr32.exe /s qmgrprxy.dll
regsvr32.exe /s wucltux.dll
regsvr32.exe /s muweb.dll
regsvr32.exe /s wuwebv.dll
netsh winsock reset
netsh winsock reset proxy
net start bits
net start wuauserv
net start appidsvc
net start cryptsvc
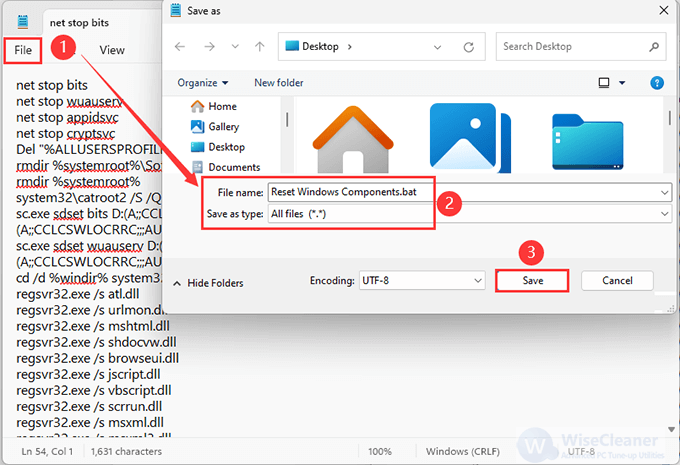
4. Click the File menu at the top, then select Save as.
5. Enter Reset Windows Components.bat in the name field and specify your preferred location for saving the file.
6. Click the Save as type drop-down menu to select All files, then click on Save.
7. Locate the saved batch file on your PC. Right-click on it and select Run as administrator from the context menu.
Once you've executed the batch file, you can keep it around. That way, you can run the file again without having to repeat the above steps next time when you encounter problems with Windows Update.
Installing the latest updates on your computer is always a good idea to keep it running securely. However, the process may not always go as expected due to driver conflicts. The 0x80070103 install error can be frustrating, but by following the steps outlined above, you should be able to resolve the issue and keep your system running smoothly.