Home >
Think Tank > Why & How to Disable Windows Defender on Windows 11
While disabling Windows Defender is generally not recommended, however, some advanced users prefer to download and use specialized antivirus or security tools that provide more features or customization options than Windows Defender.
As we all know, severe software conflicts can cause
BSOD. That’s way these users may choose to disable Windows Defender to avoid conflicts and ensure that only one antivirus solution is active on the system. So for anyone who intend to install other antivirus software on their Windows 11, this article could come in handy.
Turn off Windows Defender temporarily in Settings
This might need to be done when you are performing some system work which needs to turn the feature of Windows Defender off momentarily. Remember to re-enable it as soon as the work finishes.
- Press the Windows key + I key to open the Settings app.
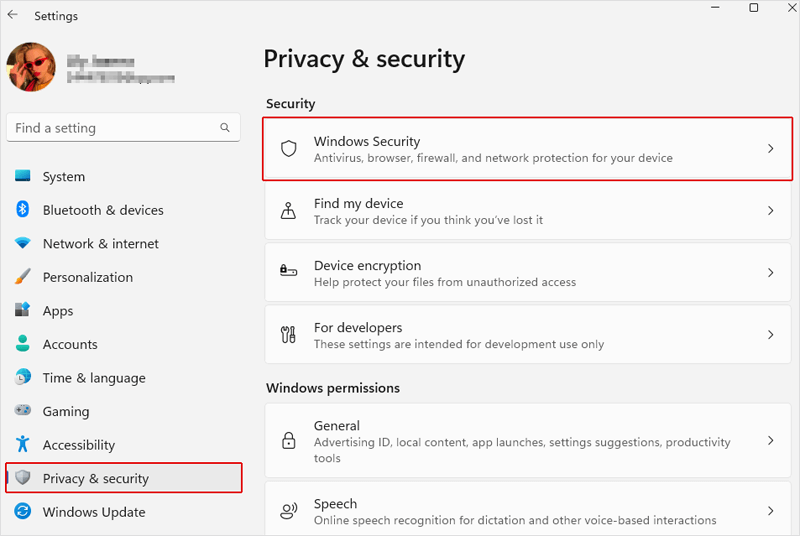
- Click on the Privacy & security tab from the left sidebar, and select Windows Security in it.
- Click on Open Windows Security to open the app.
- In the app, click on Virus & threat protection.
- Under the Virus & threat protection settings section, click on Manage settings.
- In the next window, toggle off the options of Real-time protection, Cloud-delivered protection, Automatic sample submission and Tamper Protection. This will temporarily turn off Windows Defender.
Disable Windows Defender permanently via Group Policy Editor
It is important to note that disabling Windows Defender should only be done after careful consideration and if you have an alternative security solution that you trust and regularly update. To disable Windows Defender in Group Policy Editor:
- Press Windows key + R to open the Run dialog box.
- Type gpedit.msc and press Enter to open the Group Policy Editor app.
- In the Local Group Policy Editor app, navigate to the following key:
Computer Configuration > Administrative Templates > Windows Components > Windows Defender Antivirus
- Double-click on Turn off Windows Defender Antivirus policy on the right pane.
- In the next window that pops up, select the Enabled option and click on Apply then OK to disable Windows Defender permanently.
Disable Windows Defender permanently via Registry Editor
Disabling Windows Defender through Registry Editor is a more permanent solution. Again, if you do decide to disable it, make sure to have an alternate antivirus solution installed and regularly update and scan your system for potential threats.
However, it is important to note that accidental changes to the registry can make your computer inoperable or malfunction. Therefore, this should only be done if you are experienced with it, and
back up your registry before performing.
- Press Windows key + R to open the Run dialog box.
- Type regedit and press Enter to open the Registry Editor app.
- In the Registry Editor app, navigate to the following key:
HKEY_LOCAL_MACHINESOFTWAREPoliciesMicrosoftWindows Defender
- Right-click on Windows Defender and select New > DWORD (32-bit) Value. This will create a new value on the right pane.
- Name the New Value #1 as "DisableAntiSpyware" and double click it to set its Value data to 1 to disable Windows Defender permanently.
Sum up
This is how to disable Windows Defender to avoid software conflicts between your installed antivirus software. It is not recommended to disable Windows Defender permanently as it provides important security features for your system. Only disable it when you have other antivirus software better than it.
It is also important to practice safe browsing habits, keep your operating system and software up to date, and use additional security measures such as strong passwords and regular backups to ensure comprehensive protection against cyber threats.


